Run your own privacy-friendly VPN with Pi-Hole and WireGuard on Kubernetes
Pi-Hole is great tool to protect your privacy by filtering requests at the DNS level. It was made to be set-up on a Raspberry Pi running in your home, but how can you stay protected when you're on the move?
In this article, we'll set up Pi-Hole to run in Kubernetes. We will also configure Wireguard so that you can connect securely to your Pi-Hole. This will encrypt all your traffic, not just DNS!
We assume that you already have a Kubernetes cluster running and that you are able to run kubectl commands from your environment.
1. Pi-Hole
Create the pihole.yaml file with the following contents. Head right after the file if you want some details on what it does!
---
apiVersion: v1
kind: PersistentVolumeClaim
metadata:
name: pihole-etc-pv-claim
spec:
accessModes:
- ReadWriteOnce
resources:
requests:
storage: 1Gi
---
apiVersion: v1
kind: PersistentVolumeClaim
metadata:
name: pihole-dnsmasq-pv-claim
spec:
accessModes:
- ReadWriteOnce
resources:
requests:
storage: 1Gi
---
apiVersion: apps/v1
kind: Deployment
metadata:
name: pihole
labels:
app: pihole
spec:
replicas: 1
selector:
matchLabels:
app: pihole
template:
metadata:
labels:
app: pihole
name: pihole
spec:
containers:
- name: pihole
image: pihole/pihole:latest
env:
- name: TZ
value: 'Europe/Paris'
- name: WEBPASSWORD
value: '<ChangeMe>'
- name: DNS1
value: '1.1.1.1'
- name: DNS2
value: 'no'
volumeMounts:
- name: pihole-local-etc-volume
mountPath: '/etc/pihole'
- name: pihole-local-dnsmasq-volume
mountPath: '/etc/dnsmasq.d'
volumes:
- name: pihole-local-etc-volume
persistentVolumeClaim:
claimName: pihole-etc-pv-claim
- name: pihole-local-dnsmasq-volume
persistentVolumeClaim:
claimName: pihole-dnsmasq-pv-claim
---
apiVersion: v1
kind: Service
metadata:
name: pihole
spec:
selector:
app: pihole
clusterIP: 10.41.0.2
ports:
- port: 80
targetPort: 80
name: pihole-admin
- port: 53
targetPort: 53
protocol: TCP
name: dns-tcp
- port: 53
targetPort: 53
protocol: UDP
name: dns-udp
The first two sections create two 1GB volumes for PiHole data.
The third section is the deployment of Pi-Hole itself:
- the Docker image is
pihole/pihole:latest. If you want to handle upgrades manually, you can replace this with a specific version such aspihole/pihole:v5.2.1. - Environment variables allow you to customise some settings. You can see all available options here. You should at least change the password.
/etc/piholeand/etc/dnsmasq.dare mounted to the two persistent volumes we created previously. Dnsmasq is a DNS server used by Pi-Hole and its configuration needs to be persisted.
The last section is the service that will expose PiHole's web interface and DNS server to the Kubernetes network. We're setting the IP address to 10.41.0.2 but you can change this if you already have other services in your cluster.
To start this service, run:
kubectl apply -f pihole.yaml
2. WireGuard
Now that Pi-Hole is running, we want to be able to access it through a VPN.
Wireguard is a recent solution with great clients on multiple platforms.
Download a client
On recent Ubuntu/Debian distributions, you can install WireGuard as a package:
sudo apt install wireguard
On macOS or iOS, you can find great clients directly on the Mac App Store.
Generate a public & private key for the gateway
We need to generate a private key for the WireGuard peer that will be running inside Kubernetes. The public key can be derived from it.
If you are on Linux, you can use the following command:
wg genkey | tee privatekey | wg pubkey > publickey
This will generate two files with pretty clear names.
If you're on macOS, you can click on the WireGuard icon > Manage Tunnels > + > Add Empty Tunnel…
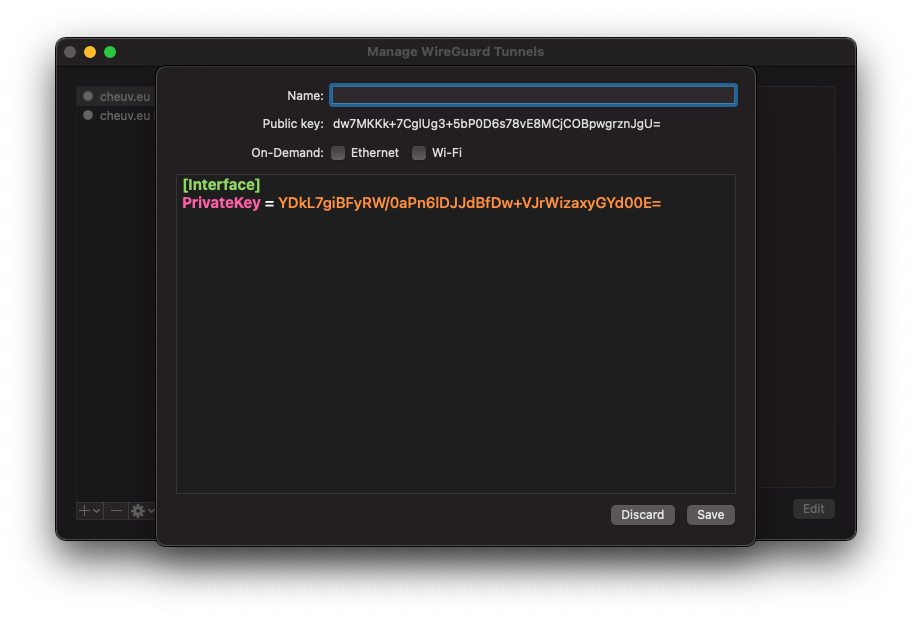
You can copy the Private key and Public key fields to a file then click Discard. We need these values to configure the server but do not need to store them on your Mac.
Create the client configuration
We will also need a private/public key pair for the client, so let's generate it right now. You can use the same steps as previously, just keep them in a separate files.
Deploy WireGuard
We'll proceed the same way as previously and create a wireguard.yaml configuration file for this new deployment.
kind: Secret
apiVersion: v1
metadata:
  name: wg-secret
type: Opaque
data:
  privatekey: <Gateway Private Key>
---
kind: ConfigMap
apiVersion: v1
metadata:
  name: wg-configmap
data:
  wg0.conf: |
    [Interface]
    Address = 10.41.1.1/24
    ListenPort = 32159
    PostUp = wg set wg0 private-key /etc/wireguard/privatekey && iptables -t nat -A POSTROUTING -s 10.49.0.0/24 -o eth0 -j MASQUERADE
    PostDown = iptables -t nat -D POSTROUTING -o eth0 -j MASQUERADE

    [Peer]
    PublicKey = <Client Public Key>
    AllowedIPs = 10.41.1.2/32
---
apiVersion: apps/v1
kind: Deployment
metadata:
  name: wireguard
spec:
  replicas: 1
  selector:
    matchLabels:
      app: wireguard
  template:
    metadata:
      labels:
        app: wireguard
    spec:
      initContainers:
        - name: sysctls
          image: busybox
          command:
            - sh
            - -c
            - sysctl -w net.ipv4.ip_forward=1 && sysctl -w net.ipv4.conf.all.forwarding=1
          securityContext:
            capabilities:
              add:
                - NET_ADMIN
            privileged: true
      containers:
        - name: wireguard
          image: masipcat/wireguard-go:latest
          command:
            - sh
            - -c
            - echo "Public key '$(wg pubkey < /etc/wireguard/privatekey)'" && /entrypoint.sh
          env:
            - name: LOG_LEVEL
              value: info
          securityContext:
            capabilities:
              add:
                - NET_ADMIN
            privileged: true
          resources:
            requests:
              memory: 64Mi
              cpu: '100m'
            limits:
              memory: 256Mi
          volumeMounts:
            - name: cfgmap
              mountPath: /etc/wireguard/wg0.conf
              subPath: wg0.conf
            - name: secret
              mountPath: /etc/wireguard/privatekey
              subPath: privatekey
      volumes:
        - name: cfgmap
          configMap:
            name: wg-configmap
        - name: secret
          secret:
            secretName: wg-secret
---
kind: Service
apiVersion: v1
metadata:
  name: wireguard
  labels:
    app: wireguard
spec:
  type: NodePort
  clusterIP: 10.41.0.3
  ports:
    - name: wg
      protocol: UDP
      port: 32159
      targetPort: 32159
      nodePort: 32159
  selector:
    app: wireguard
The first section defines a secret which will be handled by Kubernetes. You should replace the private key with the one you generated earlier for the gateway.
The second section is the WireGuard configuration for the gateway peer. You need to replace the Public Key for the client. Note that the IP address for your client is specified manually.
If you want to add other clients later, you will need to generate a private/public key for them, define their IP address and add a new [Peer] section in the gateway configuration.
The third section is the deployment itself. A few notes here:
- An initContainer is used to change some network settings on the host. Also, the WireGuard container itself will have some high privileges in order to manipulate network interfaces. You should take this in consideration if your Kubernetes cluster has some other services running on it.
- Configuration files and private key are retrieved from the previously defined sections.
Finally, a service is defined so that your WireGuard deployment is accessible. The ClusterIP allows it to be able to talk with the Pi-Hole deployment. The nodePort allows the service to be accessible directly through the node's public IP.
Once again, you can start the service with:
kubectl apply -f pihole.yaml
Create client configuration
Now that your gateway is ready, you can configure your client.
If you are using the CLI, you should create the following file in /etc/wg0.conf. With GUI clients, you can just copy/paste it in the settings.
[Interface]
PrivateKey = <Client Private Key>
Address = 10.41.1.2/32
DNS = 10.41.0.2
MTU = 1370

[Peer]
PublicKey = <Gateway Public Key>
AllowedIPs = 0.0.0.0/0
Endpoint = server.example.com:32154
Interface defines the client-side configuration. The Address is the IP Address assigned manually to your client. The PrivateKey is specific to this client and should match the PublicKey set in the server configuration. The DNS setting tells WireGuard to send DNS queries to the Pi-Hole.
Peer defines the gateway that the client will connect to. Add the Gateway PublicKey here and replace its hostname and port so that your client can find it. AllowedIPs defines which IP addresses will be routed through the VPN. You have two options here:
- If you want all traffic to be encrypted, keep
0.0.0.0/0. This is much safer but also means that your connection will depend on your gateway's bandwidth. This may also be more expensive if you are paying for traffic on the gateway side (this is often the case on Cloud environments). - If you only want DNS requests to be sent through the VPN, set this value to
10.41.1.0/24: this is Pi-Hole's IP Address.
You can now connect the tunnel using the buttons from your graphical client or by running:
wg-quick wg0 up
Once the VPN is up, you can view the Pi-Hole dashboard at http://10.41.0.2/admin/.